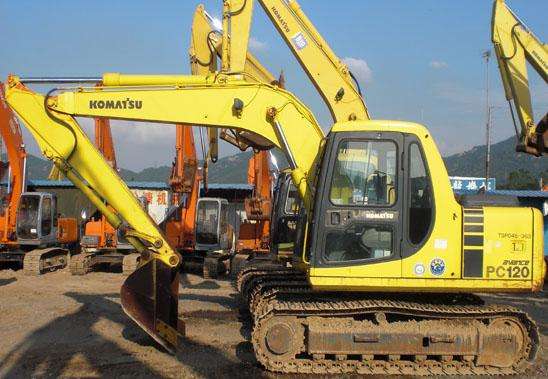
How to fix leak on pc120 komatsu excavator final drive
How to fix leak on pc120 komatsu excavator final drive , Do you need to find out how to fix leak on pc120 komatsu excavator final drive ? This video will guide you how to do this easy task. watch the video and then surf our website for more repair tips or watch more videos about pc120 hydraulic system, hydraulic oil filter cartridge and hydraulic pump oil exchange.
pc120 komatsu excavator-loosen the bolt that’s on the axle
You may have to do some prep work to get the wheel off, depending on how rusty it is.
If you can, loosen the bolt that’s on the axle before you raise the car up. If not, try using WD-40 or PB Blaster and let it sit for a while before you try to turn the axle by hand.
If you don’t have any WD-40 or PB Blaster, use a torch to heat up the bolt. Be careful not to heat up everything around it too much, though!
Once you get the wheel off, take it to a shop and have them check out your brakes and bearings for any damage.
You’ll need a lug wrench (or breaker bar) and a socket set.
pc120 komatsu excavator-remove oil cap
Remove the oil cap.
Use a wrench to loosen the oil cap then remove it. The oil cap is located on top of the engine, usually inside a black plastic housing. It may be on the left or right side of the engine depending on your vehicle’s make and model.
In most cars, you will only need to turn the cap counterclockwise to remove it. If you encounter resistance, try turning it clockwise very briefly before turning it counterclockwise again.
Place a drip pan underneath the drain plug.
The oil drain plug is usually located underneath the engine at the front or rear of the crankcase, though in some cars it is located on one of the sides of the crankcase.
If you have trouble finding your drain plug, consult your owner’s manual for its location. If you do not have an owner’s manual handy, you can find one by visiting your manufacturer’s website or by calling their customer service line.[1]
Once you locate your drain plug, place a drip pan beneath it so that you can catch all of the old oil as it drains from your car’s engine.[2] If you are placing a drip pan under a front drain plug, position it directly underneath the plug so that oil will not leak.

pc120 komatsu excavator-Semake sure there’s no pressure on the oil
Make sure there’s no pressure on the oil
Before you start, make sure that all edges of the valve are free of oil. If there is oil, it may blow in your face when the valve is released.
Remove the cap and wear gloves
Wear gloves and grab a part of the cap. Gently turn it counterclockwise, then unscrew it completely. Place it on a clean cloth or paper towel to prevent dirt from getting into the bottle or from spilling any remaining contents.
Tighten the cap by hand
To ensure tightness, tighten the cap by hand before using a wrench to tighten it again. The last thing you want is for your stubborn valve cover to leak after you’ve just put in new gaskets!
pc120 komatsu excavator-take out the seals see if there’s any damage on it
To check the seals, you need to know what they look like. The seals will be on the bottom of the pod, on the metal plate that is attached to the plastic bag that houses your coffee. It’s a metal plate with tiny little holes in it to let air out, but not enough to let coffee out.
There should be a bunch of seals along this metal plate. If there are no seals, you probably have a damaged pod and won’t get any coffee out of it. If there are seals and they’re intact, you should be able to get your coffee!
pc120 komatsu excavator-replace the seals if necessary and install them
If you decide to replace the seals, the following process will help you get them out of the housing. There are several ways to do this, some more effective than others. I’ve tried a fair number of them, and what I describe below is my preferred method.
The goal is to drive the seal out of the housing without damaging it. In order to do that, we need a piece of steel that fits just inside of it. You can use any piece of steel, but I found that using a socket from a socket wrench set works really well. You can see in the picture above that the socket fits quite nicely into the seal opening and it’s large enough to give us good leverage when tapping it through with a hammer.
Once you have your tool ready, put the open end of the seal over it and place it onto something solid that won’t move (a table works great). Now take your hammer and gently tap on the lip of the seal until it pops off:
Keep tapping around until you push it all the way through:
Once you’ve done this with both seals, clean up their openings with some brake cleaner if they have any old grease or dirt on them. Put some fresh grease on both sides of each new seal.
pc120 komatsu excavator-clean everything off really good make sure you don’t get any debris in the seal when installing it
In order to replace the door bottom seal, you will need to remove the door. Remove the hinge pins, and place them on a towel or in a glass so they don’t roll away.
Remove the door, and remove the old weatherstripping by prying it up with a paint scraper or putty knife. Be careful not to scratch the surface of the door.
Clean off any residue left from the old weatherstripping with mineral spirits or naptha. Clean everything off really good, make sure you don’t get any debris in the seal when installing it.
Unroll your new weatherstripping, and check both sides of it for any defects. If there are any cuts or damage to it, go ahead and return it for a new one. Apply some three-in-one oil to any parts of the weatherstripping that will be in contact with metal. This includes hinges, striker plates, etc. You can also apply some silicone grease to these parts as well if you wish (this is what I do).
Apply a small bead of clear silicone caulk along both sides of the new weatherstripping where it will butt up against your door frame (top and bottom). You can do this now or after it’s installed on your.